Software and configuration
Installation using Graphical TrinityX installation wizard
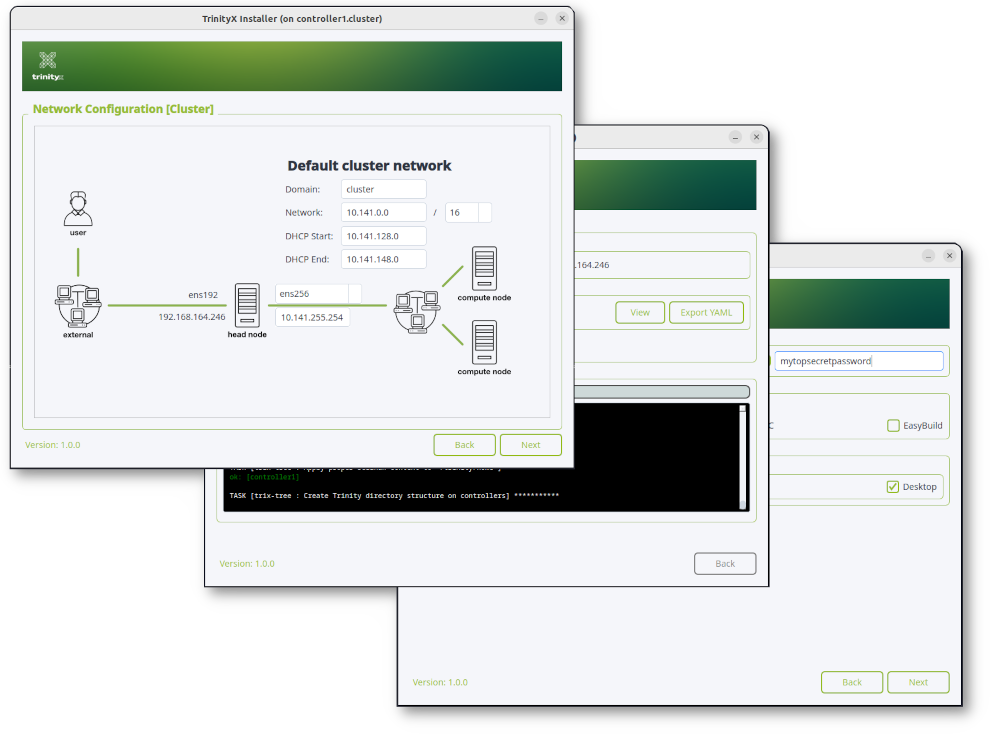
Download a graphical installer of choice and simply following the steps.


These installers run on either windows, linux or mac and allow you to install a remote controller/cluster. The linux installer can also be run on the controller itself to perform the installation.
Notes
The controller still has to be a based on a RedHat family distribution.Not all features are available using this method.
Installation using commandline
The installation is started from the to-be-controller node. Note that:
- The controller is installed using a base/Minimal installation (see supported distributions).
- The steps previously mentioned are assumed to be configured (hostname, network configuration and partitioning),
- SELinux is set to permissive (enforced is not yet supported),
- The installation is carried out as root,
- Any proxy or firewall has been configured correctly, the installation will install software from other repositories.
Cloning the code
Note with git, it will default to the main branch. This will have all the latest stable code. If you want to stick with a point-release, download the tagged releases instead:
# git clone --branch {tag} http://github.com/clustervision/trinityX
Where {tag} is any of the release numbers in https://github.com/clustervision/trinityX/releases
Clone TrinityX repository into your working directory. Then run prepare.sh to install all the prerequisites:
# git clone http://github.com/clustervision/trinityX
Cloning into 'trinityX'...
warning: redirecting to https://github.com/clustervision/trinityX/
[...]
Receiving objects: 100% (16396/16396), 63.00 MiB | 19.31 MiB/s, done.
Resolving deltas: 100% (9240/9240), done.
TrinityX installation method
Go to the directory where you have the Ansible code. This could be the place where you have cloned or unpacked the code to. We will assume it is /root/trinityX.
The TrinityX configuration tool will install and configure all packages required to set up a working TrinityX controller. First, make sure that all pre-requisites are present. This can be easily done by running the prepare.sh script:
# cd trinityX
# bash prepare.sh
[...]
Complete!
Please modify the site/hosts.example and save it as site/hosts
Please modify the site/group_vars/all.yml.example and save it as site/group_vars/all.yml


#### Please configure the network before starting Ansible ####
Note the last warning. The network must be configured since a lot of cluster services run on the internal cluster network interface, see Pre-installation
The configuration for a default controller installation is described in the file controller.yml, as well as the files located in the group_vars/ subdirectory of the TrinityX tree, while the list of machines to which the configuration needs to be applied is described in the file called hosts. Copy the .example files to the production version:
# cd ~/trinityX/site
# cp hosts.example hosts
# cp group_vars/all.yml.example group_vars/all.yml
You will now have to edit 2 files:
/root/trinityX/site/group_vars/all.yml/root/trinityX/site/hosts
Ansible configuration
These files can be edited to reflect the user’s own installation choices. For a full list of configuration options supported by TrinityX, refer to TrinityX configuration variables Ansible configuration variables.
The group_var/all.yml needs at least the following adjustments, note the 10.14. addresses are the defaults. The controller hostname trix_ctrl1_hostname must be set correctly, e.g. matching hostname --short on the controller.
# -----------------------------------------------------------------------
# Default hostname and IP for the controller
# In an HA pair, those are the hostname and IP for the first controller.
# Those variables are required, with or without HA.

trix_ctrl1_ip: 10.141.255.254
trix_ctrl1_bmcip: 10.148.255.254
trix_ctrl1_heartbeat_ip: 10.146.255.254
trix_ctrl1_hostname: controller1
The firewall is configured on the controller, the interface names must match. See nmcli con show for interface names.
# -----------------------------------------------------------------------
# Default firewalld configuration
# Only public tcp/udp ports are allowed on the public interfaces
# whereas everything is allowed on the trusted interfaces

firewalld_public_interfaces: [ens3]
firewalld_trusted_interfaces: [ens6]
firewalld_public_tcp_ports: [22, 443]
firewalld_public_udp_ports: []
HA or High Availability
Enabling HA can be done by setting ha: true in group_vars/all.yml.
Other parameters are:
enable_ipmilan_fencing: trueThis requires valid BMC config for the controllers as well as fence_ipmilan_login and fence_ipmilan_password.enable_heartbeat_link: trueallows an additional ring for heartbeat. The actual ip addresses can be configured before or after the installation.
Typical config would be:
#########################################################################
#                         High Availability                             #
#########################################################################
# -----------------------------------------------------------------------
# Do we want HA?
# Set to 'False' to disable HA, set to 'True' to enable it.

ha: true

# -----------------------------------------------------------------------
# whether we want to use ipmi for H/A fencing

enable_ipmilan_fencing: true

# -----------------------------------------------------------------------
# IPMI H/A fencing credentials. Used in conjunction with HA
# Being ignored if setting enable_ipmilan_fencing is set to false

fence_ipmilan_login: 'user'      <--- if fencing set to true, this MUST be set correctly
fence_ipmilan_passwd: 'password' <--- this one too

# -----------------------------------------------------------------------
# Whether or not to configure the corosync heartbeat link (ring 1)
# Requires correct configured trix_ctrlX_heartbeat_ip.

enable_heartbeat_link: true

#########################################################################
Fencing is supported by enforcing stonith. The BMC-s of each controller need to be configured to match the settings for ip address, name and password in the HA section. A mismatch will result in a non proper working HA setup. Alternatively, fencing can be disabled but is not recommended. Each controller should be able to reach the other's BMC-s for stonith to work. This includes the correct BMC username and password.
The heartbeat link is an addition, not mandatory. This means that each controller will communicate 'pacemaker' over their normal interfaces but will use the heartbeat link when it's available. It's common to have a back-to-back or dedicated heartbeat link as well to cover for switch interruptions.
Both controller configs need to be set:
# -----------------------------------------------------------------------
# Default hostname and IP for the controller
# In an H/A pair, those are the hostname and IP for the first controller.
# Those variables are required, with or without HA.

trix_ctrl1_ip: 10.141.255.254
trix_ctrl1_bmcip: 10.148.255.254        <--- the IP configured for the BMC
trix_ctrl1_heartbeat_ip: 10.146.255.254 <--- used for dedicated heartbeat link
trix_ctrl1_hostname: controller1

# In a non-H/A setup, all of the following variables will be ignored:
# - the variables for CTRL will be set to the same as CTRL1;
# - the variables for CTRL2 will be ignored.

# Hostname and IP of the second controller

trix_ctrl2_ip: 10.141.255.253
trix_ctrl2_bmcip: 10.148.255.253        <--- the IP configured for the BMC
trix_ctrl2_heartbeat_ip: 10.146.255.253 <--- used for dedicated heartbeat link
trix_ctrl2_hostname: controller2

# Floating hostname and IP

trix_ctrl_ip: 10.141.255.252
trix_ctrl_hostname: controller
shared disk
The default configuration for shared_fs_disk uses a DRBD disk /dev/vda which has to be changed to match your configuration:
shared_fs_disks:
  - name: 'trinityx'
    type: 'drbd'
    disk: '/dev/vda'    <--- must be changed.
    device: '/dev/drbd0'
    fstype: 'zfs'
    partitions:
    - mount: '{{ trix_home }}'
      options: '-o xattr=sa'
      xmount: true
    - mount: '{{ trix_shared }}'
      options: '-o xattr=sa'
      xmount: true
    - mount: '{{ trix_ohpc }}'
      options: '-o xattr=sa'
      xmount: true
    - mount: '{{ trix_ha }}'
      options: '-o xattr=sa'
It utilizes a ZFS based pool, which (ZFS) is typically installed during the prepare phase. All of the above can be customized to match your requirement as mentioned in the Pre-install documentation Make sure that the disk is equal in size and blank on all controllers.
Further tailoring may be required, depending on the cluster requirements.
The host (site/hosts) file is used to install the controller node. The hostname must match:
[controllers]
controller1 ansible_host=127.0.0.1 ansible_connection=local
Using Ansible to install the controller
Once the configuration files are ready, the controller.yml Ansible playbook can be run to apply the configuration to the controller(s):
# pwd
# /root/trinityX/site/
# ansible-playbook controller.yml
PLAY [controllers] ***********************************************************************************************************************************

TASK [Gathering Facts] *******************************************************************************************************************************
ok: [controller1]
[...]

PLAY RECAP *******************************************************************************************************************************************
controller1           : ok=404  changed=304  unreachable=0    failed=0    skipped=67   rescued=0    ignored=0
This must complete without any errors. If there are any, please review the message and correct the problem. The installation will not work reliable when the playbook has not succesfully completed. Note you can run ansible-playbook multiple times without any harm.
Once the controller.yml playbook is complete, you will need to configure a software image. This can be done by starting the compute* playbook.
Note
It is NOT possible to upgrade a single controller setup into an HA setup! Please make sure to select the right path going forward.Using Ansible to install the compute image
The creation and configuration of an OS image for the compute nodes uses the same tool and a similar configuration file as for the controller. While the controller configuration applies its setting to the machine on which it runs, the image configuration does so in a directory that will contain the whole image of the compute node.
# pwd
# /root/trinityX/site/
# ansible-playbook compute-redhat.yml
[...]
PLAY [compute.osimages.luna] *************************************************************************************************************************

TASK [Gathering Facts] *******************************************************************************************************************************
ok: [compute.osimages.luna]

TASK [trinity/wrapup-images : Cleanup the image] *****************************************************************************************************
changed: [compute.osimages.luna]

TASK [trinity/wrapup-images : Cleanup the image] *****************************************************************************************************
skipping: [compute.osimages.luna]

TASK [trinity/wrapup-images : Cleanup /tmp] **********************************************************************************************************
changed: [compute.osimages.luna]

PLAY [controllers] ***********************************************************************************************************************************

TASK [Gathering Facts] *******************************************************************************************************************************
ok: [dev-l2controller-001]

TASK [trinity/pack-images : Pack the image] **********************************************************************************************************
changed: [dev-l2controller-001]

PLAY RECAP *******************************************************************************************************************************************
compute.osimages.luna      : ok=112  changed=69   unreachable=0    failed=0    skipped=109  rescued=0    ignored=1
controller1                : ok=41   changed=17   unreachable=0    failed=0    skipped=14   rescued=0    ignored=0
This will set up a RedHat image and configure it in Luna. This can be verified with:
# luna osimage list
+----------------------------------------------------------------------------------------------------------------------------------------------------------------------------------------+
|                                                                                      << Osimage >>                                                                                     |
+---+---------+------------------------------+---------------------------------------------------------+----------------------------+-------------------------+--------------+-----------+
| # |   name  |        kernelversion         |                        kernelfile                       |         imagefile          |           path          | distribution | osrelease |
+---+---------+------------------------------+---------------------------------------------------------+----------------------------+-------------------------+--------------+-----------+
| 1 | compute | 4.18.0-477.27.1.el8_8.x86_64 | compute-1697629733-vmlinuz-4.18.0-477.27.1.el8_8.x86_64 | compute-1697629768.tar.bz2 | /trinity/images/compute |    redhat    |    None   |
+---+---------+------------------------------+---------------------------------------------------------+----------------------------+-------------------------+--------------+-----------+
Any newly created image will reside in the directory defined by the configuration variable trix_image which points to /trinity/images/ by default.